Showing posts with label AX7. Show all posts

Saturday, January 12, 2019

Important changes to how we will update the production going forward

Not long ago, it was published on docs some updates on how we will be doing self-servicing of our non-production environments. There is one particular statement I want to address with this post:
You will need to provide a combined deployable package for customizations. That is, all custom extension packages, including ISV packages, must be deployed as a single software deployable package. You will not be able to deploy one module at a time. This was always a recommended best practice and is now enforced.
It has been recommended for a long while to always ensure any changes to the application, either updates or when adding new modules, are serviced first to the sandbox and then to production in one single package. And then I mean the same single package containing everything which is not already in standard. This would include:
  • ISV solutions and deliveries
  • Customer specific customizations (ie from your partner)
  • Hotfixes (relevant only for version 8.0 and older supporting individual hotfixes)
It may seem counter-intuitive and unnecessary to do it like this. You may argue we should be able to push individual modules and updates to the sandbox and to production. Why enforce "single package"? What are the benefits of this?

The core reason is that we are moving away from actually updating the application, but we are instead actually replacing the application. The application becomes an immutable piece of software, that does not change or is susceptible to change. 

This means the "updated" version of the application instead is setup and runs on a new instance, replacing the previous version of the application. The new pattern will sustain and ensure the following expectations:

Predictability - One single package having all the code and metadata, and all the module dependencies secured, ensures the same behavior every time it is used in a deployment.

Repeatability - Repeating the same package deployment on the next environment should have little to no risk, for example when repeating the install done in sandbox when installing in production.

Recovery and Rollback - The single package is a last good known state, which we can rollback to, in case we need to recover due to deployment failure. 

Scale-out - Reusing the same single package lets us easily and safely repeat deployment on new instances, and allowing for a safe and easy way to scale out.

Portability - The same package can be safely used if you for whatever reason needs to relocate your installation somewhere else around the world.

Think about all the benefits of this. It is music in my ears. 

In theory, today, you could service your sandbox and production with individual isolated packages. You could handle the order you install the packages, to ensure not breaking dependencies. You could install in a test environment to try test updated versions of packages, in order to see if they broke something in conjunction with any of the other existing packages. It is possible - but it is not recommended. Instead, it is recommended to use the build and release procedures to create a single deployable package, containing all the changes, across all modules and packages.

Reading the announcement of the new immutable pattern for self-servicing environments is great news. It may change the way you've published updates in the past, if you used to push individual "delta" packages. If you've published single deployable packages from your build environment, you're following best practices, and the enforcement will not change how you've done things. 

What do you think about this? Share your comments and thoughts either in the comments or on Twitter.

Thursday, November 1, 2018

Upgrade from 7.x to 8.+ series | Post 5 | Upgrade Sandbox and finally Production

Introduction

[EDIT]: Changes since November 2018 has forced me to made some changes to these series. I will point out the changes.

In these series of posts. I will try to run you through the process of how you can complete the upgrade from 7.x to 8.+ of Dynamics 365 for Finance and Operations.

Quick navigation:
Upgrade from 7.x to 8.+ series | Post 1 | Start in LCS
Upgrade from 7.x to 8.+ series | Post 2 | Deploy Dev and Grab source DB
Upgrade from 7.x to 8.+ series | Post 3 | Validate Code and Data in Dev

Prepare a sandbox upgrade for validation

[EDIT]: This section has been modified.

Before you can go ahead and request an upgrade of Production, you will want to do a pre-production validation in the sandbox environment. You may read the details here:
https://docs.microsoft.com/en-us/dynamics365/unified-operations/dev-itpro/migration-upgrade/upgrade-latest-update#upgrade-your-tier2-standard-acceptance-test-sandbox-environment

Before you start this process, you will want to make sure you have the following uploaded to LCS Asset Library:
  • Upgraded application ("Application deployable package"), downloaded or released from the successfull build
  • The Update package ("Platform and application binary package") which you prepared on step 3 in the series, and installed on the build in step 4 of the series. 
You will service the sandbox and install the packages. If you're smart, you will merge the two packages into one single package, and service them together in one single operation. Merging package works as long as long as they are on same platform version.

Now you can let the users start hammering on the system to potentially discover everything is flawless (knock on wood).

If you do not have any Production deployed yet, the steps are:
  1. Redeploy sandbox with target version. Make sure to select the upgraded application package. If you don't, you will have to install it afterwards, before you continue to the next step.
  2. Import the upgraded bacpac from step 3 in the series. Here you can use the tooling in LCS if the database was uploaded into the Project Asset Library.
  3. Validate!

Production

When you have validated the sandbox, and you are ready to upgrade Production, you will replay the steps you did in the sandbox, but this time in Production. 

Good luck!

Upgrade from 7.x to 8.+ series | Post 4 | Setup a new Build

Introduction

[EDIT]: Changes since November 2018 has forced me to made some changes to these series. I will point out the changes.

In these series of posts. I will try to run you through the process of how you can complete the upgrade from 7.x to 8.+ of Dynamics 365 for Finance and Operations.

Quick navigation:
Upgrade from 7.x to 8.+ series | Post 1 | Start in LCS
Upgrade from 7.x to 8.+ series | Post 2 | Deploy Dev and Grab source DB
Upgrade from 7.x to 8.+ series | Post 3 | Validate Code and Data in Dev

Some preparations before deploying Build VM

Basically, what we want to do is to have the new 8+ branch the build environment will pull code from. Beyond that you may want to have additional development branch to isolate ongoing development in the future, but I've left that out of the scope of this article.
If you've read the previous posts, you know the Code Upgrade in LCS created a "release" branch folder with a prepared upgraded application, and given that you've completed the code upgrade and validation as mentioned in the previous post, you should now be able to copy the result over to a new main branch for 8+.

The flow can be displayed sort of like this:


Now, obviously you're most likely going to delete/remove the old main branch and possibly also the "release" branch in the future. But the flow above can still be achieved. There are many ways to actually do this, and some have very strong opinions on how to branch the source.

You can easily create a new main branch by using the prepared "release" as source. You can do this using Source Code Explorer inside of Visual Studio running on your development VM.


You will simply give the new branch a unique name, separating it from the old main.


The name of the branch can actually be changed later, if that bothers you. However, we will deploy a Build environment later, and this will create a Build definition that needs the branch name to be correct - or the build definition will not work.

Don't forget, your changes locally on the VM will need to be committed to Azure DevOps (VSTS).


Another thing we will want to do is to create ourselves an isolated Agent Pool in Azure DevOps (VSTS). We want to make sure only 8+ build agents are in this pool of agents. You will need at least one, but who knows if you will add more in the future.

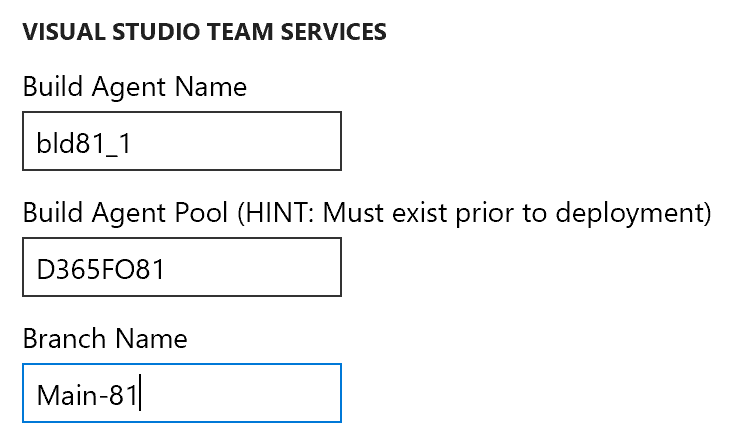
You will need some permissions in Azure DevOps (VSTS) to create this, but start at the Organization level and create a new Pool. I named it D365FO81 (since it will be used for 8.1.x). I have lots of projects not related to Dynamics, so I didn't want to push the agent pool to all projects.


I then opened the Project itself and added the Agent Pool to the project.


Deploy Build VM

[EDIT]: This section has been edited.
Now, we are ready to head back to LCS and deploy a Build VM. And with the preparation above, we can fill out the VSTS-part like this, and it will make sure to put the build agent on the right pool, plus make sure the deployed build defintion points to the right branch.


Select the correct topology, and if you're deploying this on a private/self hosted Azure Subscription, you can chose a setup with DS13v2 and 14 standard disks of size 64GB. Again, leaning on the community here to learn what they recommend. These things change over time, and I can't promise I'll get back to this post and update it.

If you deleted the existing MS Hosted build environment, and deploy a new MS Hosted, you won't get any options to decide on VM size or disk setup.


Notice I fill in the name of the Agent Pool and the name of the branch. I also give the agent a unique name. It will take quite some time before the Build environment is up and running.

EDIT: Before you continue, go ahead and install the same update package installed on the Development environment from step 3 in my series. Installing this same "Platform and application binary package" on the Build environment will ensure the build is running on the exact same version, and the artifact created from the build pipleline is of the same version. The next time, in the future, you want to get more updates of the platform and application, you can create the update package through the Update tiles on the Build environment. 

When it is, you will go ahead and schedule a build on the new Build Definition. The job will be picked up by the right Agent Pool, and then picked up by the agent sitting on the Build VM.

When the Build is complete, make sure to upload the Deployable Package to the LCS Asset Library. You will need it for the final post.


Upgrade from 7.x to 8.+ series | Post 3 | Validate Code and Data in Dev

Introduction

[EDIT]: Changes since November 2018 has forced me to made some changes to these series. I will point out the changes.

In these series of posts. I will try to run you through the process of how you can complete the upgrade from 7.x to 8.+ of Dynamics 365 for Finance and Operations.

Quick navigation:
Upgrade from 7.x to 8.+ series | Post 1 | Start in LCS
Upgrade from 7.x to 8.+ series | Post 2 | Deploy Dev and Grab source DB
Upgrade from 7.x to 8.+ series | Post 3 | Validate Code and Data in Dev (you are here)

Connect to code

[EDIT]: This section has been edited.

Given the code upgrade is completed in LCS, a process that shouldn't take many hours, and the Development VM is published, you can connect the local PackageLocalDirectory to the branch folder holding the "release".

Open Visual Studio, Connect to the Azure DevOps (VSTS) account and the right project, and then map your workspace to the "release". Notice I point the Metadata folder under the release to my local PackageLocalDirectory.


Let's have a quick look at the result from the Code Upgrade process. Like I wrote in the first post, the upgrade removes Microsoft hotfixes, but keeps any other custom packages and modules.

Put another way, the code upgrade will first copy your source metadata, then remove Microsofts modules, and it will sort of look a little bit like this.


If you were to take one of your existing development VMs and connect to the "release" branch folder and run a "Get Latest", the exact same steps would happen on your machine; you would see all the Microsoft Standard Module files be deleted under your PackageLocalDirectory. DON'T DO IT!

You may wonder why that doesn't happen on the new development VM. Well, since the Workspace you have just created on the new VM was created after the cleanup of the upgraded branch, nothing gets deleted locally when you run "Get Latest" on the new "release" branch folder.

So next you basically will have to make sure your application builds and works as expected - before you can continue.

EDIT: I would recommend using this opportunity to look at the update tiles on this Development environment, and then take the updates of standard now. This process will create a "Platform and application binary package" (also referred to as "plat+app"). Install this update on the Development environment now, and plan on using this same update package through out the process, on the build environment and the sandbox, all the way to production. The exception is if you find that you need to take a new and even more up-to-date package. This package will contain both platform updates AND application updates. When you install it on the Development environment, you will get the latest source code on the box as well.

Upgrade the Data 

[EDIT]: This section has been edited.

Assuming you Exported the database from the sandbox using LCS, you can download the bacpac directly from the project asset library. Currently there is no solution in LCS to Import a database, but there is a guide on docs for the steps involved importing a bacpac manually. Using D365fo.tools below, you can do the same manual import with ease. Just skip the download part of my original post below, but execute the Import part. 


When you application is 8.+, you can go ahead and get the 7.x database and upgrade it on this development environment. This process should reveal any possible technical issues of sorts.

Let's first download the database to the VM from the cloud storage mentioned on post 2. You can either use Microsoft Azure Explorer or use the community driven PowerShell library d365fo.tools, like this.

Import-Module d365fo.tools

$dbsettings = Get-D365DatabaseAccess

$params = @{
    AccountID = 'STORAGE_ACCOUNT_NAME'
    AccessToken = 'LONG_AND_SECRET_ACCESS_KEY_FOUND_ON_THE_STORAGE_ACCOUNT_IN_THE_AZURE_PORTAL'
    Blobname = 'NAME_OF_THE_BLOB'
    Path = 'D:\Backup\'
    FileName = 'sandbox_adhoc.bacpac'
}

Invoke-D365AzureStorageDownload @params

[EDIT]: After downloading the bacpac from the Project Asset Library, you can start the import steps below.

With the database extract (bacpac), you will have to import it, overwriting the existing AxDB. There are a few gotchas when doing this, and you can either do it manually, following the guide on docs, or you can again use the PowerShell library d365.tools to help you out:

Import-Module d365fo.tools

$bacpacFile = 'D:\Backup\sandbox_adhoc.bacpac'
$sourceDatabaseName = "AxDB_Source_$(Get-Date -UFormat "%y%m%d%H%M")"

#Remove any old temp source DB
Remove-D365Database -DatabaseName $sourceDatabaseName -Verbose

#Stop local environment components
Stop-D365Environment -All

# Import the bacpac to local SQL Server
Import-D365Bacpac -ImportModeTier1 -BacpacFile $bacpacFile -NewDatabaseName $sourceDatabaseName -Verbose 

#Remove any old AxDB backup (if exists)
Remove-D365Database -DatabaseName 'AxDB_original' -Verbose

#Switch AxDB with source DB
Switch-D365ActiveDatabase -DatabaseName 'AxDB' -NewDatabaseName $sourceDatabaseName -Verbose

Start-D365Environment -All

The script above does several things, like importing the bacpac and replacing the existing AxDB with the imported database. The whole process may take quite some time, because the bacpac import is a slow process. Also, the actual mdf and ldf file for the AxDB will have a date and timestamp, making it unique for each time you import - if you need to do it more than once.

When the database is imported, you will need to head back to LCS and apply the Software Deployable Package created by Microsoft specifically for doing the DataUpgrade. This process will also take some time, but at the end of it, you will have an upgraded database. The package is named DataUpgrade-8-1 and if you look at its description, it is one single package that upgrades the database from any previous 7.x version to 8.1.


In the next post, I will show one possible way to prepare your new build for 8+, which is a necessity before you can continue with updating your Sandbox and later your Production.

Upgrade from 7.x to 8.+ series | Post 2 | Deploy Dev and Grab source DB

Introduction

[EDIT]: Changes since November 2018 has forced me to made some changes to these series. I will point out the changes.

In these series of posts. I will try to run you through the process of how you can complete the upgrade from 7.x to 8.+ of Dynamics 365 for Finance and Operations.

Quick navigation:
Upgrade from 7.x to 8.+ series | Post 1 | Start in LCS
Upgrade from 7.x to 8.+ series | Post 2 | Deploy Dev and Grab source DB (you are here)
Upgrade from 7.x to 8.+ series | Post 3 | Validate Code and Data in Dev

Deploy 8.x environments


Choose the version closest to the target version you are aiming for.

You will need to deploy new environments. There is no "in-place" upgrade of your existing environments. The new environments will be on the version you are upgrading to. Fortunately, deploying new environments is easy to do through Lifecycle Services (LCS). You will need a decent Development VM to connect to the upgraded metadata, and check the code for any issues.

I typically go for a DS13v2 which has local SSD. I normally give it 14 disks of size 48GB, which will all be striped for maximum throughput. This has served me well so far. I don't chose premium storage, but go for standard storage. There are probably lots of preference out there, and I'm more than willing to learn from the community what they recommend.

Make sure the VM is hosted on your own (or customers) Azure Subscription. This way you are guaranteed to get local admin user. Also make sure the topology is Development. Pick an empty database, as you won't need that Contoso data for what we're about to do.

Prepare Database

[EDIT]: This section has been edited.

You can simply Export the database through LCS portal. LCS will create a bacpac of the sandbox database and save it in the project Asset Library. You should consider Refresh the sandbox with a fresh copy of the Production database. All of these steps are now easily done directly in the LCS portal.


While the Development VM is deploying, here's another neat thing you can do, if you haven't already done so. Setup a cloud Storage Account in the Azure Subscription. It can be a cheap Standard Storage (general purpose v2) type, with only Local Redundancy, on a Cold Tier - nothing fancy. Create yourself a blob storage where you can put the database which you will get from your source environment. If you haven't done this in Azure Portal before, let this be your first time. Things to consider; the Storage Account name must be unique (for that specific Azure Region). But you're a good citizen, and always used a good naming practice, right?

You will need three things from this cloud storage:
  1. The Storage Account Name
  2. The name of the blob storage
  3. The Access Key (which is found on the Azure Blade - look for the yellow key icon).
When you have the storage account ready, I bet the deploying of the Development VM is still spinning, so let's prepare a backup of the source database. We will use it to validate the upgrade. This is just a test, to make sure the upgrade experience will be smooth.

Head over to your Sandbox (Tier2) AOS, and extract the database from there. If you want to test on a fresh copy from Production, you will have to get Microsoft to do a Database Refresh first. But let's assume the one on the Sandbox is fresh enough.

The possibly quickest and easiest way to get the database extracted, at the point of writing, and while we are waiting on Microsoft to get the tooling in place in LCS, is to use the community driven D365FO.tools PowerShell Library.

Install the library on the AOS server using the following command. You'll have to click "Yes" and "Yes to all" on any questions.

Install-Module d365fo.tools

Then run the following to extract the database. It basically prepares a bacpac where all the post-SQL are run, and saves it do the D-drive.

Import-Module d365fo.tools

$dbsettings = Get-D365DatabaseAccess

$baseParams = @{
    DatabaseServer = $dbsettings.DbServer
    SqlUser = 'sqladmin'
    SqlPwd = 'SQLADMIN_PASSWORD_FROM_LCS'
    Verbose = $true   
}
$params = $baseParams + @{
    ExportModeTier2 = $true
    DatabaseName = $dbsettings.Database
    NewDatabaseName = $($dbsettings.Database + '_adhoc')
    BacpacFile = 'D:\Backup\sandbox_adhoc.bacpac'
}

Remove-D365Database @baseParams -DatabaseName $($params.NewDatabaseName)
New-D365Bacpac @params

Then using the cloud storage you've hopefully prepared, lets upload the bacpac to the cloud. We will later download it to the development VM.

Import-Module d365fo.tools

$params = @{
    AccountID = 'STORAGE_ACCOUNT_NAME'
    AccessToken = 'LONG_AND_SECRET_ACCESS_KEY_FOUND_ON_THE_STORAGE_ACCOUNT_IN_THE_AZURE_PORTAL'
    Blobname = 'NAME_OF_THE_BLOB'
    FilePath = 'D:\Backup\sandbox_adhoc.bacpac'
    DeleteOnUpload = $false
}

Invoke-D365AzureStorageUpload @params

The database extract in form of a bacpac now awaits in the cloud storage, and when the development VM is ready, you can use the same PowerShell Library to download it and install it on your development VM.

But first, you need to make sure the application actually builds. I will address that in the next post.


Upgrade from 7.x to 8.+ series | Post 1 | Start in LCS

Introduction

[EDIT]: Changes since November 2018 has forced me to made some changes to these series. I will point out the changes.

In these series of posts. I will try to run you through the process of how you can complete the upgrade from 7.x to 8.+ of Dynamics 365 for Finance and Operations.

Quick navigation:
Upgrade from 7.x to 8.+ series | Post 1 | Start in LCS (you are here)
Upgrade from 7.x to 8.+ series | Post 2 | Deploy Dev and Grab source DB
Upgrade from 7.x to 8.+ series | Post 3 | Validate Code and Data in Dev

The details for this upgrade is already very much detailed already on docs, so this article is just "another" way of taking you through the steps. I will focus on the simplest example possible. I know "your miles may vary" if you have a more complex environment you need to upgrade. Things like over-layered code, dependencies to other systems through integrations, or your solution has third party solutions added, which may not be ready for upgrade. But let's assume for the sake of simplicity that you're on 7.x without any over-layering and you want to get on version 8 with as little fuzz as possible.

In fact, if you do not have any over-layered code, and all extensions are compatible with 8+, this part will take less time than it will take you reading the post.

Code upgrade 

Before you begin the code upgrade, you need to make sure a "magic" file is created on your repository in Azure DevOps. The file is not created by any other process (I know of). The file holds the value of the version you are upgrading from, and it needs  to be named "ax7.version" and must sit in the Trunk/Main folder. There are a couple of ways to get the file created, but one very simple and pragmatic way is to simply create the file in the repository through the browser. Open the repository and navigate to Trunk/Main and create a new file directly.


You need to fill the file with the version number of your source. The version number can be found in docs, but allow me to list a few of them here:

7.3.11971.56116
7.2.11792.56024
7.1.1541.3036

In the example below I am upgrading from 7.3.


The file should be placed on the same level as the Metadata-folder.


When the file is created, you can go ahead and run the code upgrade in LCS.


The code upgrade tool does a couple of things. You will get some reports and information of what the process discovers of work to do, based off whatever you have in your Trunk/Main. But the important thing it does, is it will create a new folder in your repository, and this folder will contain the upgraded version of your code.
That is right; it copies whatever is in Trunk/Main, puts it into another folder, and does a couple of additional things, like removing all the hotfixes you may have previously added to Trunk/Main.
Why? Because you're going to a new version, and those old hotfixes either already exists in the target version, or you will need to reapply them using updates created specifically for the version you are going to. In fact, if you run the Code Upgrade process again and again and again, you will end up with as many copies as you run the tool. Don't worry, you're permitted to delete copies you do not want to keep.

Oh, and the copy (or copies) are also marked as a branch from Trunk/Main. You can see this of you check the folder Properties from either the Releases or from Trunk/Main.


Do you really need to run the code upgrade? Well, you could create a 8+ branch yourself and merge in the modules you're keeping to your 8+ branch, and then try build and resolve any issues. But consider that the code upgrade tool does that for you, gives you some details on what it finds. You don't have to do much beyond the steps out lined above. Time saved, and cost saved.

Actually, while LCS analyzes your code, you can start on the next step in the process, and I will talk about those in the next post.

Monday, August 6, 2018

Servicing fails on step 6 while updating AOS

There are some hotfixes that patch modules and packages which are only available on the "onebox" sandbox (Tier 1) environments. If you happen to add these hotfixes to your VSTS Main Branch, you will most likely end up trying to install these modules and packages on your Tier 2 (ie UAT) environments, and this deployment will most likely fail. The reason is now the package has references to binaries which are not present on Tier 2.

One example is the module DemoDataSuite. From the deployment log you will find the following statement:

Running command: C:\DynamicsTools\nuget.exe install -OutputDirectory "G:\AosService\PackagesLocalDirectory\InstallationRecords" dynamicsax-demodatasuite -Source G:\DeployablePackages\GUID\AOSService\Packages

From the output, you would then find the following:

The running command stopped because the preference variable "ErrorActionPreference" or common parameter is set to Stop: Unable to resolve dependency 'dynamicsax-applicationfoundationformadaptor'.

It's true the DemoDataSuite depends on ApplicationFoundationFormAdaptor, and this Formadaptor Module is not on the Tier 2 environment. 

A simple solution is to simply change the default variables for the build defintion, and make sure the DemoDataSuite is excluded from package generation. 

Instructions on how to exclude named packages from the build can be found here:

If you suspect you've made custom modules and packages, and are worried they are causing your servicing to fail similarly, you may want to check the references yourself. Have a look at this post for more information on how to do that:

Friday, June 15, 2018

How do you apply the latest updates on Dynamics 365 Finance and Operations

When you deploy and environment of Dynamics 365 for Finance and Operations, you are asked to pick a version of the application along with the platform version. At the point of writing, the latest application version is 8.0 and platform version is 18. We know application version 8.0 and onwards to not allow for any overlayering of standard code. We also know that version 7.3 (the version prior to 8.0) allows overlayering.

If you choose to publish 7.3, you will get the application is it was in December 2017, and you will have to go through the process of applying a fair number of hotfixes to get your application updated.

In this post I will address this process. It is fairly well documented on docs, but I suppose it helps to read it from various sources. This post focus on the minimum effort needed to get updated. Depending on your scenario, it might be more complicated, if you for example have customizations, including extensions.

Before you leave this page, I should tell you there is a bonus part at the end of it.

This process is in two parts:
  1. Binary Updates
  2. Application Updates (or X++ Updates if you like)

Binary Updates

This part can actually be done by a non-developer. It is fairly easy to complete, and should be safe.

I start with updating a DEV environment, assuming it is aligned to the remaining environments (STAGE, PROD) when considering updates. From the environment page in LCS, I can tell there are lots of updates waiting to be installed.


I start by opening All Binary updates. Notice they are all already marked for download. You can't cherry pick these updates, you get them all. I could take only the platform updates instead, but I want everything updated, hence "All Binary updates".


When you continue, notice that you do not actually download the update, rather it is saved back to asset library.


This may take a while, as the entire thing is a couple of GB in total. Allow Asset Library analyze the package before you continue.


When the package is ready, you can go ahead and run "Maintain" and "Apply Updates" form the environment page. Pick the Binary Update package and allow for the Runbook to install it.


NOTE! This process will seed the package to your environment. Make sure you have enough space available on your Service Volume. You also want to make sure nobody is running Visual Studio on the machine while it is serviced. If your VM runs with standard disks (HDD) instead of premium storage (SSD), then the copying of files may time out. If that happens, just press the "Resume" button on the environment page. You might also notice that the machine even reboots as part of the process.

After the Binary Updates are installed, the tiles should hopefully report this.


Application Updates

The next process is a bit more technical and needs the attention of someone with a developer role.

Start by opening the Application Updates, not just the Critical Updates, but all of them. You will click "Select all" and press "Add". This will mark all of them for download.

Since I had over one thousand KBs, it took several seconds for LCS to create the download, so I simply had to wait for it to be sent to the browser for download. It is not a big file. In my example all updates were around 80MB.

The file is a Package.zip, so you will have to unblock it and unzip the file to get the actual HotfixPackageBundle.axscdppck file. That is a nice and long file extension, which I can only assume means AX Source Code Deployable Package. ;-)

Tip! Did you know the file is actually a compressed file using zip? If you change the file extension to zip and unpack it, you will see all the packages and a manifest defining any dependencies between them. If you even take one of the single packages out, change the file extension to zip, you can get the details of that package. What files will be changed and how elements will be changed, and also what KB numbers are covered by that package. 


Now, here comes the tricky part. While it is possible to apply this package through Visual Studio, I have found it safer to do the next part using command line util (SCDPBundleInstall.exe). Furthermore, I also ensure that there are no service or application potentially locking any files in the Package Local Directory. That means, no Visual Studio running, no IIS running and no Dynamics Ax Batch running. Have a look at the script I have shared at the end of this article.

The process is basically split in two steps:

  1. Prepare. This process analyze the content of the package and makes sure all files which will be changed in the Package Local Directory are put in source control (VSTS). That means add and edit commands, ensuring we can put them into VSTS if we mess up and need to go back to how things were before installing the updates. 
  2. Install. This process analyze the content of the package and actually change files in the Package Local Directory. Any files added or removed will also be put in the list of pending changes to source control (VSTS).

You cannot run them in one single operation, you need to run Prepare first, then commit the pending changes to VSTS. Then you run it again with the Install mode to change files.

The prepare step takes less time, but it does take time. If you want to see what it is actually doing, the closest you get is having a look under your users Temp folder. It will extract the packages and the dependency manifest under C:\Users\USERNAME\AppData\Temp\SCDPBundleInstall. You will observe the tool is extracting each package, looking at the manifest of the package, and checking what files the package will change. As part of this process, it also ensures the change is added to "pending changes". When the tool is done, it removes the folder.


When prepare is complete, you will have to open Visual Studio and commit the pending changes in order to "backup" the files to source control. Give this commit a good name, so you know it is related to preparing a hotfix bundle install. Starting Visual Studio will start IIS Express, and since you will close Visual Studio when your changes are committed, you will again have to ensure IIS is stopped before you run the install step.
Remember, when Visual Studio is closed, IIS Express is normally stopped and IIS is started. This process can take a couple of seconds, so wait a few seconds before you continue with the install step.

The install step takes the longest time, but also uses the same folder to extract and analyze the packages.

Before you go ahead and commit all the updates standard modules to VSTS from DEV, you will need to make sure it builds. Your customizations may be broken, and your overlayering may have new conflicts that needs to be resolved. All of this must be handled before the application updates are put in source control (VSTS).

From there, you initiate the BUILD, take out the final artifact containing all the updated application modules (packages) and put it up in Asset Library.

When you are ready to install in STAGE, start with the Binary Updates package in Asset Library, then install the Application Update package in Asset Library.

Some potential troubleshooting hints

I did run into some issues while doing this. All of which I had to resolve manually, and some were reported back to Microsoft Support.

You might experience delays when applying the application updates due to limitations of how many transactions you are allowed to do against VSTS. These are delays, so it should only mean things takes longer.

If you get errors while running the prepare or install, it might be something wrong with one of the packages, either due to invalid manifest or dependencies. I've only seen this a few times, and it is not expected. If that happens, contact Microsoft Support.

Also be aware that if one module fails to build for whatever reason, all modules depending on that module will most likely also throw errors. So don't fall off your chair if you get a high number of compilation errors. It might just be one error, creating a chain or other errors. Solve that one error, and the other go away.

Bonus

Using the SCDPBundleInstall tool is documented on docs, but for your convenience I will share a little PowerShell script that helps you run the prepare and install step. If you see any errors or improvements, I am grateful for all feedback.

function InstallHotfixBundle ([string] $file, [string]$vstsAccountName, [bool] $installMode = $false)
{
    $VSTSURI = 'https://{0}.visualstudio.com' -f $vstsAccountName

    # PLD is normally on C, J or K drive
    $pldPath = "\AOSService\PackagesLocalDirectory"
    $packageDirectory = "{0}:$pldPath" -f (('J','K')[$(Test-Path $("K:$pldPath"))],'C')[$(Test-Path $("C:$pldPath"))] 

    $command = ('prepare','install')[$installMode]

    if ($installMode -eq $true)
    {
        Write-Host "INSTALL MODE!" -f Yellow
        Get-Service w3svc | Stop-Service -Force
        Get-Service DynamicsAxBatch | Stop-Service -Force
    }
    else
    {
        Write-Host "PREPAREMODE ONLY!" -f Yellow
    }

    if (Test-Path -Path $file)
    {
        Unblock-File -Path $file
        $InstallUtility = '{0}\Bin\SCDPBundleInstall.exe' -f $packageDirectory
        $params = @(
            '-{0}' -f $command
            '-packagepath={0}' -f $file 
            '-metadatastorepath={0}' -f $packageDirectory
            '-tfsworkspacepath={0}' -f $packageDirectory
            '-tfsprojecturi={0}/defaultcollection' -f $VSTSURI
        )

        & $InstallUtility $params 2>&1 | Out-String

        if ($installMode -eq $true)
        {
            Write-Host "Hotfixes have been applied. Verify through build & sync, and commit the updates to VSTS!" -f Green
        }
        else
        {
            Write-Host "Touched elements ready for backup to VSTS. Commit changes before continue with install! Remember to close Visual Studio when you are done!" -f Green
        }
    }
    else
    {
        throw 'No such file {0}' -f $file
    }
}

# Remove the # to uncomment the line you want to run
#InstallHotfixBundle -file 'D:\Hotfix\HotfixPackageBundle.axscdppkg' -vstsAccountName 'YOUR_VSTS_ACCOUNT'
#InstallHotfixBundle -file 'D:\Hotfix\HotfixPackageBundle.axscdppkg' -vstsAccountName 'YOUR_VSTS_ACCOUNT' -installMode $true


Enjoy!

Sunday, February 4, 2018

Installing a Software Deployable Package (SDP) using PowerShell

Now the PowerShell involved here is miniscule, so don't expect much. But I'm going to post this either way.

You will most likely install Software Deployable Packages using LCS, as outlined on the official docs, so why would you need a PowerShell script for this? It so happens that you need to install the package manually if you for example need to upgrade from 7.2 to 7.3 of Operations.

You download the package from LCS. After unblocking the zip-file, and extract it somewhere. I typically extract it on the Temporary Drive, the D-drive. Then you simply need to run this small script to initiate the installation locally.

#Requires -RunAsAdministrator

function InstallSDP()
{
    $BinaryPackageLocation = 'D:\Update'
    $Installer = $('{0}\AXUpdateInstaller.exe' -f $BinaryPackageLocation)

    if (Test-Path -Path $Installer)
    {
        Set-Location $BinaryPackageLocation
        & $Installer 'quickinstallall' 2>&1 | Out-String
    }
    else
    {
        Write-Output $("No update found in {0}" -f $BinaryPackageLocation)
    }
}

InstallSDP

Now, this will not work unless you have local admin rights. So the yes, that means if you plan to run the 7.2 to 7.3 upgrade, you need to run it on a machine where you have local admin rights. This is pointed out in question 14 on Robert Badawys FAQ on the matter.

Notice I am using the "quickinstallall" command here, and this is only applicable for OneBox Developer VMs.

So what about "devinstall"-command? You cannot use the devinstall for the upgrade package, but you can use it in other scenarios where you install customization packages and hotfixes. It was introduced in Platform Update 12, and is intended for use without the need for local admin privileges.


Friday, February 2, 2018

PowerShell script to toggle Maintenance mode

In order to change licence configurations on Operations, you need to toggle maintenance mode on or off. This can be done using a Setup tool, but on the development machines where we do not have local admin rights, the only solution would be to hack the database, like Kurt Hatlevik shows us in this blog post.

In this post I will show how you can toggle maintenance mode on or off using PowerShell. The script is intended for OneBox environments. Just paste it into a new ps1 file for future use, or run it through PowerShell ISE.

DISCLAIMER: Don't run this unless you are prepared to take the heat from restarting the entire web application. It stops and starts the web server.

function ToggleMaintenanceMode()
{
    $parm = @{
        ServerInstance = 'localhost'
        Database = 'AxDB'
        Query = "UPDATE SQLSYSTEMVARIABLES SET [VALUE] = IIF([VALUE]=1, 0, 1) WHERE PARM = 'CONFIGURATIONMODE'"
    }

    Get-Service "W3SVC" | Stop-Service -Force
    Invoke-Sqlcmd @parm
    Get-Service "W3SVC" | Start-Service  

    $parm.Query = "SELECT [VALUE] FROM SQLSYSTEMVARIABLES WHERE PARM = 'CONFIGURATIONMODE'"
    $result = Invoke-Sqlcmd @parm
    [int]$value = $result.Value

    Write-Output "Configuration mode $(('disabled','enabled')[$value])"
}

ToggleMaintenanceMode

The script shows you how you can easily run SQL commands, and even retrieve values back to your PowerShell script.

Enjoy!

Sunday, January 28, 2018

PowerShell script for synchronizing the database

UPDATE! Just a day after posting this article, I got some valuable feedback that made me rewrite the script. I kept the top part of the post as is, for historical reference, but the new script is below. Keep reading!

In this post I want to share a neat way to use a PowerShell script for running the database synchronization when working. You probably already know you can run the database synchronization from within Visual Studio, and that is probably where most developers and consultants will do this operation, but sometimes you want the option to just run a script. Examples of this is when you copy a database between environments, or during upgrade operations.

Let's put the script out, and I'll discuss the parts below.

#Requires -RunAsAdministrator
Import-Module "$PSScriptRoot\AOSEnvironmentUtilities.psm1" -DisableNameChecking
Import-Module "$PSScriptRoot\CommonRollbackUtilities.psm1" -DisableNameChecking

function Run-DBSync()
{
    $SyncToolExecutable = '{0}\bin\Microsoft.Dynamics.AX.Deployment.Setup.exe' -f $(Get-AosWebSitePhysicalPath)
    $params = @(
        '-bindir',       $(Get-AOSPackageDirectory)
        '-metadatadir' , $(Get-AOSPackageDirectory) 
        '-sqluser',      $(Get-DataAccessSqlUsr)
        '-sqlserver',    $(Get-DataAccessDbServer)
        '-sqldatabase',  $(Get-DataAccessDatabase)
        '-setupmode',    'sync' 
        '-syncmode',     'fullall' 
        '-isazuresql',   'false' 
        '-sqlpwd',       $(Get-DataAccessSqlPwd)
    )
    & $SyncToolExecutable $params 2>&1 | Out-String    
}

Run-DBSync

Let's look at what this script does. The very first line is just a hint to the runtime that this script must be run in elevated mode. The reason is that it must get some information from the system that requires admin rights. Typically I also stop some services, like the Management Reporter Process Service, before I run the synchronization, and obviously a non-admin will struggle to do that.

Notice that I have imported some modules, and you may be wondering where I got those. These PowerShell modules are part of the Software Deployable Packages, and either you can create one yourself, or simply download one of those made available by Microsoft in LCS. Extract the package and look under the following path, \AOSService\Scripts. Just grab the two files and make sure you save them alongside your script, like the example below:


The rest is simply building the parameters for the synchronization operation, and running the tool that does the job. The output is sent to the host, so if you want to look at the result you may want to run this script in PowerShell ISE (Admin mode).

What is also neat, is that it will pick up the database credentials used for your environment, so you don't have to put those details in the script yourself.

In any case, it is a neat study in how you can organize your script in such a way that you get the code all in one visible column. It's also a stepping stone to start building your own set of scripts to maintain your development environments.

Finally, a small disclaimer: Microsoft may very well change how their PowerShell modules work in the future, so if that happens, the script above will have to change.

Updated script - no modules and works for non-admin

So here is a way to run the database synchronization without having to rely on the PowerShell modules and without having to have local admin rights. Remember this is limited to OneBox environment.

function Run-DBSync()
{
     # Find the correct Package Local Directory (PLD)
    $pldPath = "\AOSService\PackagesLocalDirectory"
    $packageDirectory = "{0}:$pldPath" -f ('J','K')[$(Test-Path $("K:$pldPath"))]  

    $SyncToolExecutable = '{0}\bin\SyncEngine.exe' -f $packageDirectory
    
    $connectionString = "Data Source=localhost; " +
        "Integrated Security=True; " +
        "Initial Catalog=AxDb"

    $params = @(
        "-syncmode=`"fullall`""
        "-metadatabinaries=$packageDirectory"
        "-connect=`"$connectionString`""
    )

    & $SyncToolExecutable $params 2>&1 | Out-String    
}

Run-DBSync

Notice how I feed the parameters to the executable here, in comparisson to the Setup tool above. It is currently stated in the docs that you may want to use the Setup tool during upgrade scenarios.

Saturday, January 13, 2018

List hotfixes using PowerShell in D365FO (AX7)

You probably already know that you can open Visual Studio and from the "Dynamics 365" menu, under "Addins" and "Apply Hotfix", you will find a grid that lists all the hotfixes installed on your environment. The list can be copied and pasted into Excel if you need a better view and you need to filter and search the list. It works, but it could be a bit easier.

In this post I will share a neat function you can use to list installed hotfixes using PowerShell. It inspired by the post from Microsoft Support (Thomas Treen), and I got some help by some of my fellow MVPs to get inspired (shout out to Martin Draab and Lane Swenka).

The function is as follows:

function Get-HotfixList()
{
    # Find the correct Package Local Directory (PLD)
    $pldPath = "\AOSService\PackagesLocalDirectory"
    $packageDirectory = "{0}:$pldPath" -f ('J','K')[$(Test-Path $("K:$pldPath"))]  
    
    [array]$Updates = @()

    # Get all updates XML
    foreach ($packagefile in Get-ChildItem $packageDirectory\*\*\AxUpdate\*.xml)
    {
        [xml]$xml = Get-Content $packagefile                         
        [string]$KBs = $xml.AxUpdate.KBNumbers.string

        # One package may refer many KBs
        foreach ($KB in $KBs -split " ")
        {
            [string]$package = $xml.AxUpdate.Name
            $moduleFolder = $packagefile.Directory.Parent

            $Updates += [PSCustomObject]@{
                Module = $moduleFolder.Parent
                Model = $moduleFolder
                KB = $KB
                Package = $package
                Folder = $moduleFolder.FullName
            }
        }
    }
    return $Updates
}

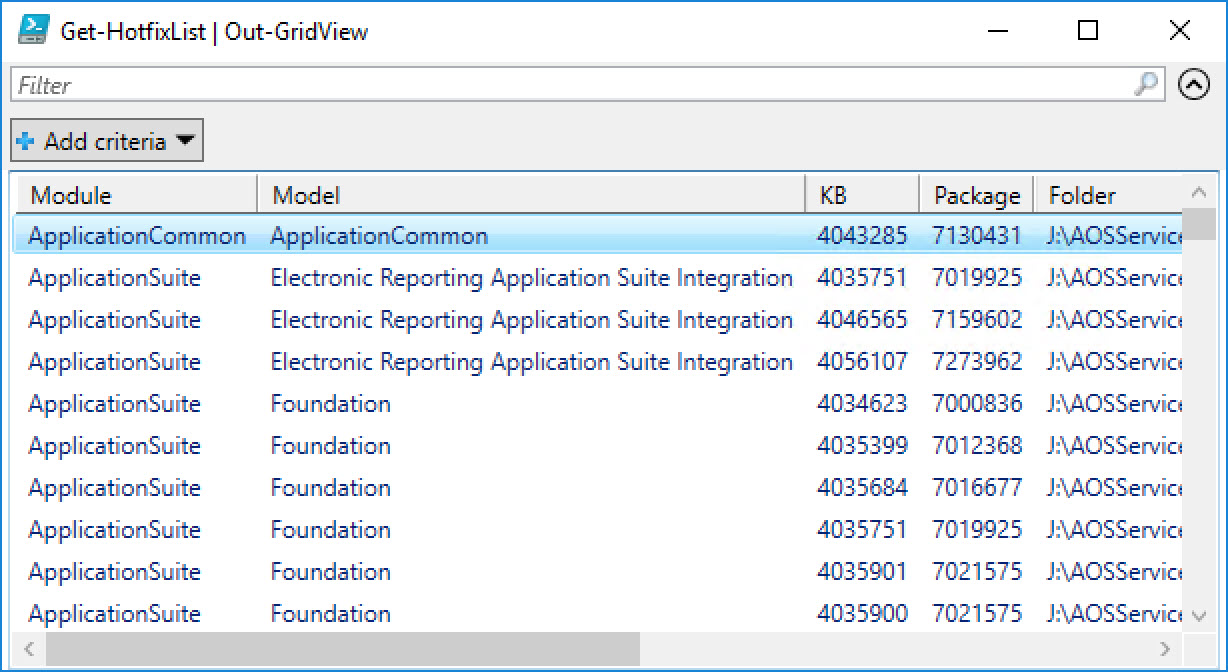
With this function, you can list out the hotfixes to a resizable, sortable and searchable grid like this:

Get-HotfixList | Out-GridView


You can list out the hotfixes into a long string where each KB number is separated by a space. Then copy this string into LCS when searching for KBs you want to use in a Hotfix Bundle.

$list = Get-HotfixList | select KB | sort KB
$list = [string]::Join(" ", $list.KB)
$list


Obviously you can use the function to quickly search for a specific hotfix.

Get-HotfixList | where {$_.KB -eq "4055564"}


And one final example, when installing a hotfix bundle, one of the steps are to compile the modules patched, and while you can do a full compile of all modules in the application, you could also just compile only the ones patched. To create a distinct list of modules, run the following statement.

Get-HotfixList | select module | sort module | Get-Unique -AsString


A quick note on the Package Local Directory (PLD) path. In my script I shift between K and J drive. I have only used this script on VMs in the cloud. If you need to run this where the PLD path is on some other drive, you will need to change that in the script.

Monday, October 2, 2017

Importing users in D365 Operations using Excel

Let me start off by admitting I was initially thinking about naming this post "Importing users in AX7 using Excel", so there, now this post suddenly became a little bit more "searcher friendly".

In this post I will show how easy you can connect to your Dynamics 365 Operations instance using Excel. Before I begin the post, let me just remind you that importing users from Azure Active Directory is perhaps easier and quicker. So this post is just to show you it is also possible to import users using Excel with the Dynamics Office Add-in.

You may have seen the Data Entity "System User" (SystemUserEntity), and you may have tried using it to add users with it, and  furthermore you may also have seen the error "A row created in data set SystemUser was not published. Error message: Write failed for table row of type 'SystemUserEntity'. Infolog: Error: Error in getting SID."


You will get the same error through Excel if you do not provide some additional columns and information while trying to create a user through that Data Entity.

You can either start off with opening Excel, install the Dynamics Office Add-in and connect it to the target instance. Or you can open the list of users directly on the instance, and open the list in Excel from there. Either way you should start with a view where you have the System User list in your spreadsheet.

The next step is to modify the Design of the view. Click the Design link first.


Then edit the System User table.


Then add the following following columns: Enabled, AccountType and Alias (Email).


Save the design changes and ensure you update the view so the added columns are populated with data.

You will notice the Type (AccountType) and Alias (Email) carry important information for how the user authenticates, in addition to the Provider column. With these columns properly populated, you should be able to add multiple rows and hit a single "Publish" from within Excel.

Given this, you can have two open Excel instances, and connect to two different instances. And then copy over users from a source to a target using Excel. As long as all the columns are available and in the same order, of course.

This post should also give you some clue to how you can use Data Management to populate a system with users through a Data Package, if that is your preference.

Monday, September 25, 2017

Initial steps to troubleshoot failed environment servicing

On the topic of patching and updating an existing D365 Operations environment I will refer to the online documentation.
There are also some great community posts that aims to help you, and you may want to check out.
I expect more posts to show up. As it is of writing this, installing updates can be a bit tedious and cumbersome. 

I will use this post to share a recent update that failed on a Platform Update. A Platform Update is expected to be a fairly straight forward and safe operation. You simply import the update to your assets in LCS and apply it to your environment (assuming you're running your environment in the cloud). I will not discuss On-Premise in this post. 

I had an environment running application 1611 with Platform Update 7. I was trying to install Platform Update 10. After it failed on several attempts, I started to try investigate why it failed. 


Here are the steps I took.

1) Identify which step failed. In my case it was step 13. (Not exactly my lucky number)


2) Find the runbook output (normally under C:\RunbookOutput) and find the PowerShell Script that fails. I simply searched the log for "13"

3) Open PowerShell ISE in Admin mode and open the PowerShell Script. You will find the script in the J:\DeployablePackages folder, and you can match the GUID from the log with the Runbook folder. The Scripts will be located in a standardized folder path.


4) Run the script and let it fail. From there you can add breakpoints and try run again and step through to try see why it failed. Use whatever you find as information when you contact Microsoft Support. Some updates fails, but should not fail, and it is important that anyone with support agreements make sure to report findings back to Microsoft. 

Now, in my particular case, the script did not fail when I ran it manually. It succeeded. I can only guess to why that is the case, but after going back to LCS and letting the update "Resume" it eventually finished with all the upgrade steps successfully. 

In any case, the initial steps above can help you push through a failing update and potentially lead you to the answer why an update unexpectedly failed. 

Wednesday, August 23, 2017

Consider changing your password Pop Up

Currently the machines deployed through LCS runs with the Account Policy that passwords has a 42 days age. Interestingly you should not change the password for servers deployed according to this statement of guidelines.

So if you get annoyed by the reminder to change the password and do not plan to republish the box any time soon, why not go ahead and get rid of the pop up.


Click the start button and type in "local". You should find the Local Security Policy Console.


From there it is just a matter of changing the expiration of the password to something other than 42, or simply set it to 0 for "never expire".


Quick and easy.

Alternatively you can use a Command Prompt (Run as Admin) with the statement:

net accounts /maxpwage:unlimited

Wednesday, August 9, 2017

Excel Applet not loading when working with D365 Office Add-in

This post is somewhat related to the post by Ievgen (AX MVP) on the Office Word integration not working with Dynamics 365 for Finance and Operations (Enterprise Edition).

If you try to connect Excel to an existing environment using the Microsoft Dynamics Office Add-in and all you see is the text "Load applets" after signing in, then it might very well be because the applets needs to be initiated from within the environment.

If you click the little flag at the bottom right, you will be able to open the messages and see the error "No applet registrations found".


Solution is simple. Open the D365 environment in your favorite browser (assuming your favorite browser is on the compatible list - hehe) and either search for the form (ie type in "Office") or navigate directly through System Administration, Setup and Office app parameters


If you see an emply grid, then the settings have not been initialized and that is the problem. Most likely you are missing settings for Office apps in general, so go ahead and initialize all parameters for all the grids accordingly.


Head back to Excel and try make it reload the applets (simply try add a trailing slash to the url). Hopefully you should get the expected result.