Sunday, November 25, 2018

Considerations when "upgrading" Dyn365FO from 8.0 to 8.1

Version 8.0 of Microsoft Dynamics 365 for Finance and Operations was released summer 2018. Just a few months later, in October, version 8.1 was released. If you have environments running version 8.0, let it be development environments, demo environments, or even production and (tier 2+) sandboxes, you might be thinking about getting them "upgraded" to 8.1.
It's not really an upgrade, but actually rather an update.

The overall process is actually a lot easier compared with coming from 7.x. I did a series of posts on how to get started here:
https://yetanotherdynamicsaxblog.blogspot.com/2018/11/upgrade-from-7x-to-8-series-post-1.html

Microsoft outlines the process in one single article here:
https://docs.microsoft.com/en-us/dynamics365/unified-operations/dev-itpro/migration-upgrade/appupdate-80-81

Why update?

One of the main differences between 8.0 and 8.1 is the latter version will be a lot easier to service with updates. Version 8.0 still supports individual application hotfixes, meaning you will download and apply them, put them in VSTS, just as you would with 7.x. You could argue the possibility to pick individual hotfixes and avoid taking all updates is a good thing, but in fact it is not the way forward. Instead of thinking that you may have to avoid hotfixes, and potentially have to "roll back" updates that breaks you, you need to shift to a mindset where any ongoing issues are immediately reported back to Microsoft which allows them to ship new updates that resolves any issues, not only for you, but for us all. With that mindset, you will want to take the 8.1 version, which does not allow for individual hotfixes, but instead gives you everything cumulative at the point you pick updates. This is also how "One Version" will behave, and on April 2019 you will be getting updates in this fashion.


So in effect, when servicing 8.1+ you get only one update tile, and it contains everything, and you download everything cumulative. You'll use the complete update package to patch your environments, and there is no need to put the updates in VSTS either. Things are just so much easier.

Development and build environments

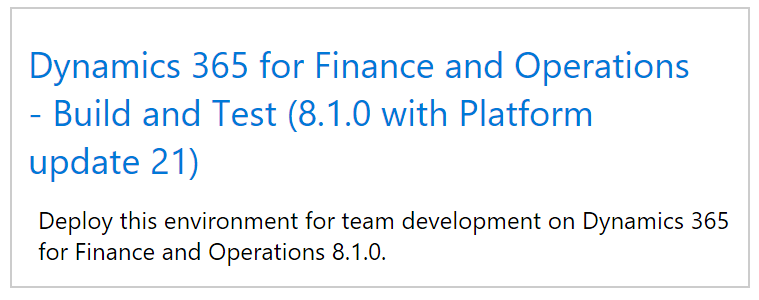
Even though Microsoft has a Software Deployable Package that does the update from 8.0 to 8.1 in the Shared Asset library in LCS, it is recommended that you deploy new 8.1 build and development environments. Why is that, you may ask. For a development environment, you will have both source code and a runtime (code compiled). Your 8.0 development environment might even have been updated with hotfixes, added back in time. Part of the process is to remove any 8.0 updates, and start from scratch with 8.1. So when you start removing already committed Microsoft application updates form Azure DevOps (VSTS), you cannot avoid this to also reflect your local copy of the source code.

But you do not need to compile Microsofts packages, so who cares if the code is wrong? Well, what if you want to debug, extend, view code? Even though you do not need to recompile Microsofts packages, you run the risk of having invalid, incomplete or even erroneous code on your development environment. So it just follows your best option is to redeploy a new set of development boxes and of course build box(es), and depending on your choice of server size and storage, the deploy of new servers they might be ready for you within 3-4 hours.

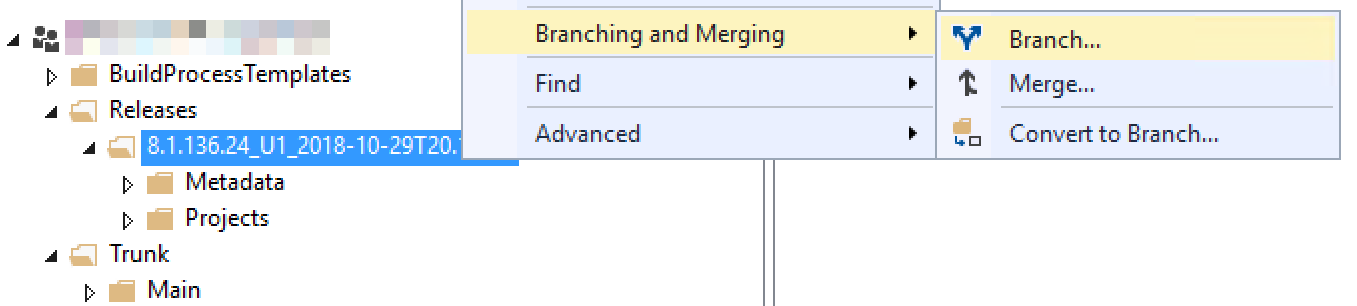
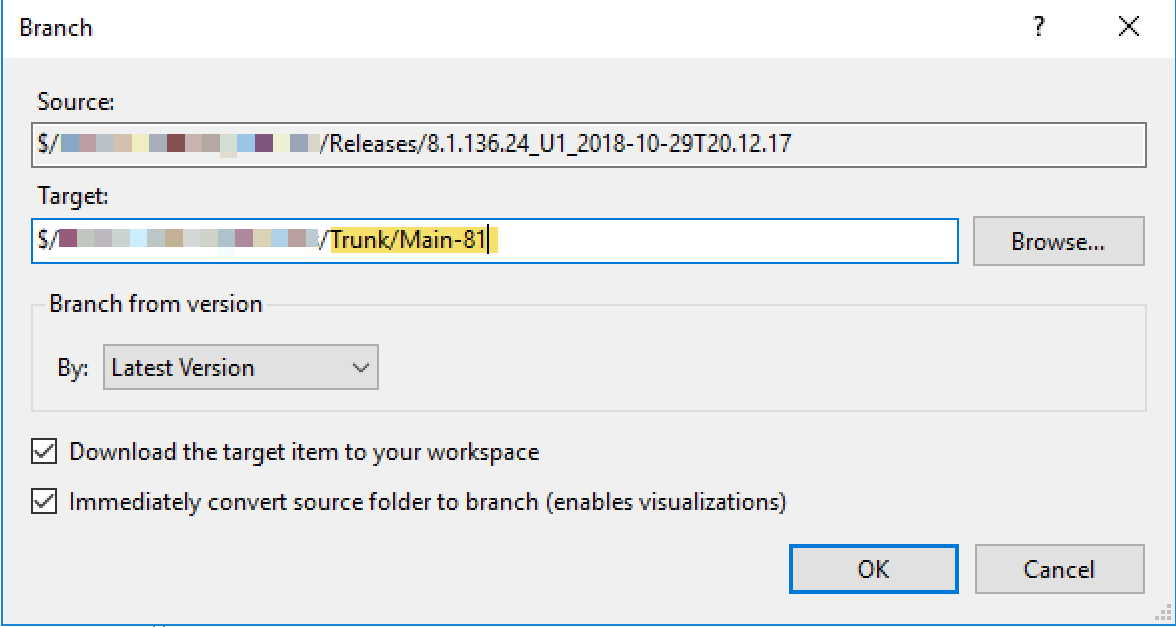
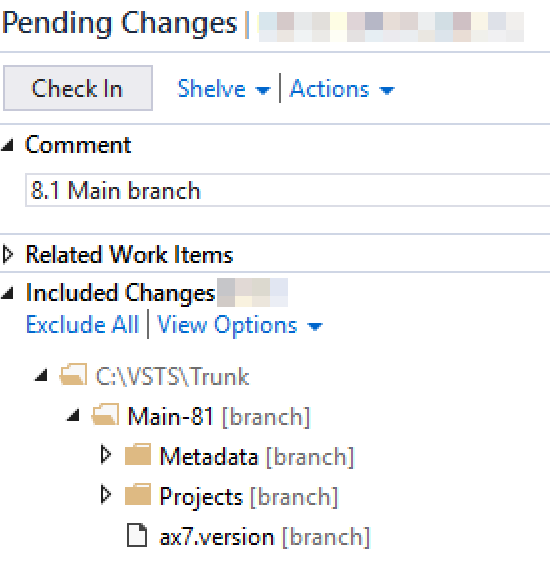
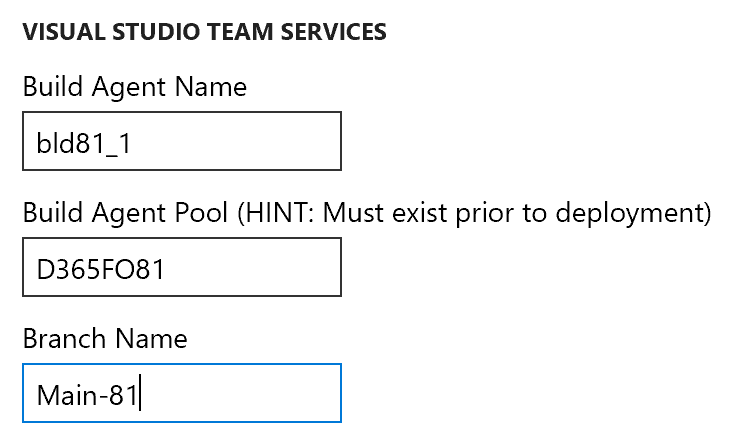
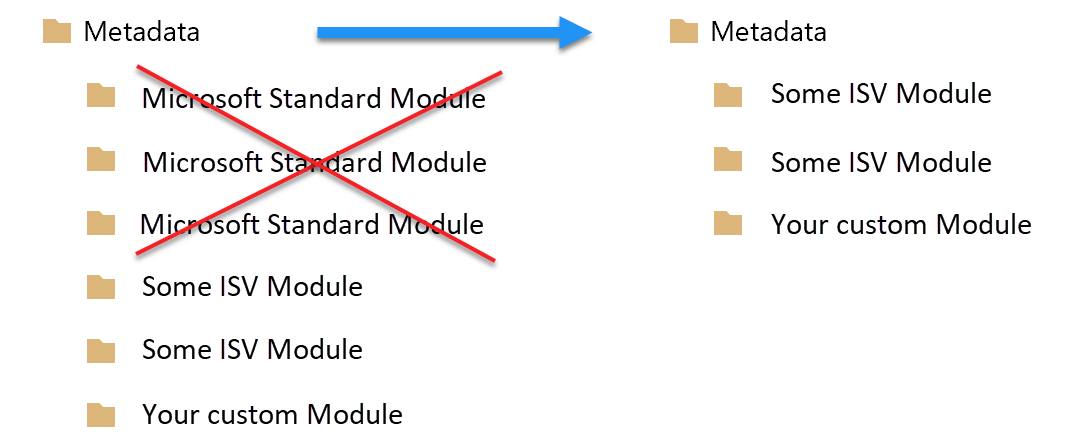
But before you connect the newly deployed development environments to the source code, it is paramount that you prepare a new 8.1 branch, which is clean from updates. It may contain 8.0 extension modules, but not any Microsoft modules. You can prepare all of this while the new environments are being deployed.

Non-development environments

What about demo, test and sandboxes? Well, typically you do not care about the source code on the demo boxes (even though it might be there), and as for acceptance test sandboxes, where you do not even have Visual Studio, it definitely doesn't matter. These environments you could just go ahead and update using the Software Deployable Package.


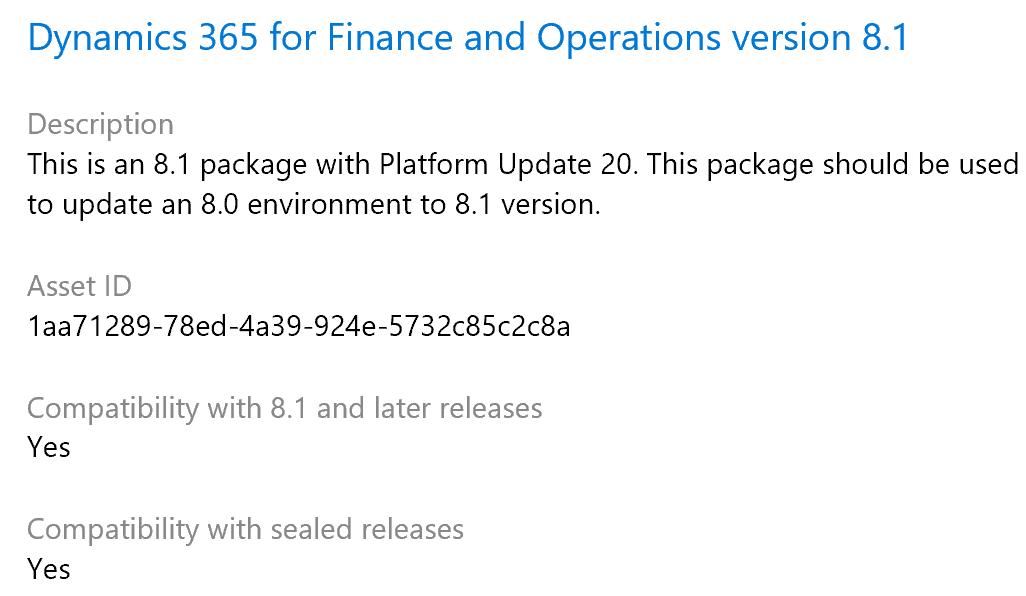
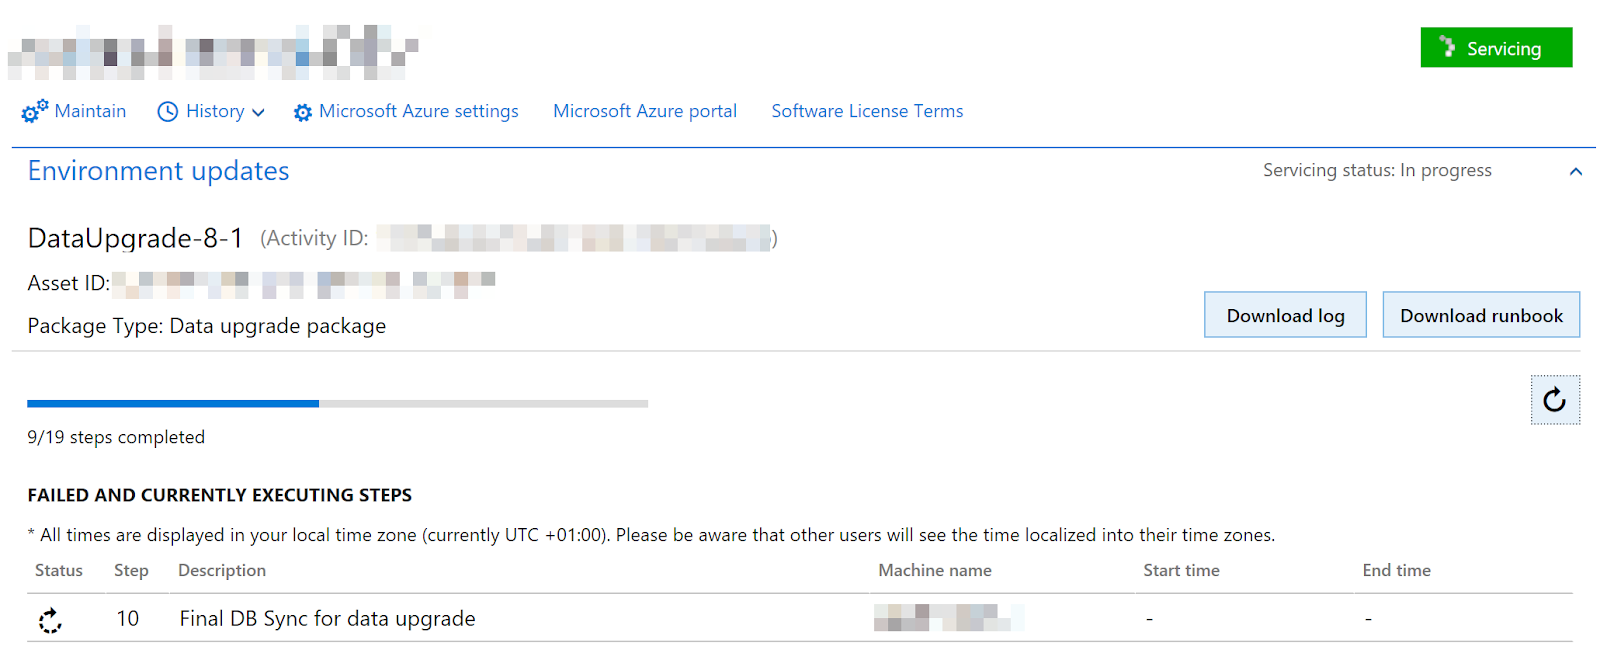
Well, unfortunately it might not just be that simple. If the environment has other non-Microsoft packages installed, LCS will prevent you from simply apply the update package. You may have some ISV-solutions or some package you've created and released, and then installed on the environment, through LCS.
LCS knows about this, and can list the non-Microsoft packages installed. In fact, if you try apply the update package, LCS will stop you, and list the packages blocking you.


Error: "Modules on the environment do not match with modules in the package. Missing modules: [...]"

In order to continue, you will need to get a pre-compiled version of these modules where they were built on a 8.1 environment. Depending on your scenario, that either means getting the 8.1 version from a vendor or partner, or simply just get your package built and released through your new and shiny 8.1 boxes.

As it is stated in the upgrade guide, you are recommended to prepare yourself one single build release of all the extension modules and packages. When you have the 8.1 package ready in the Asset Library, you can simply merge it with the update package, and execute the update.


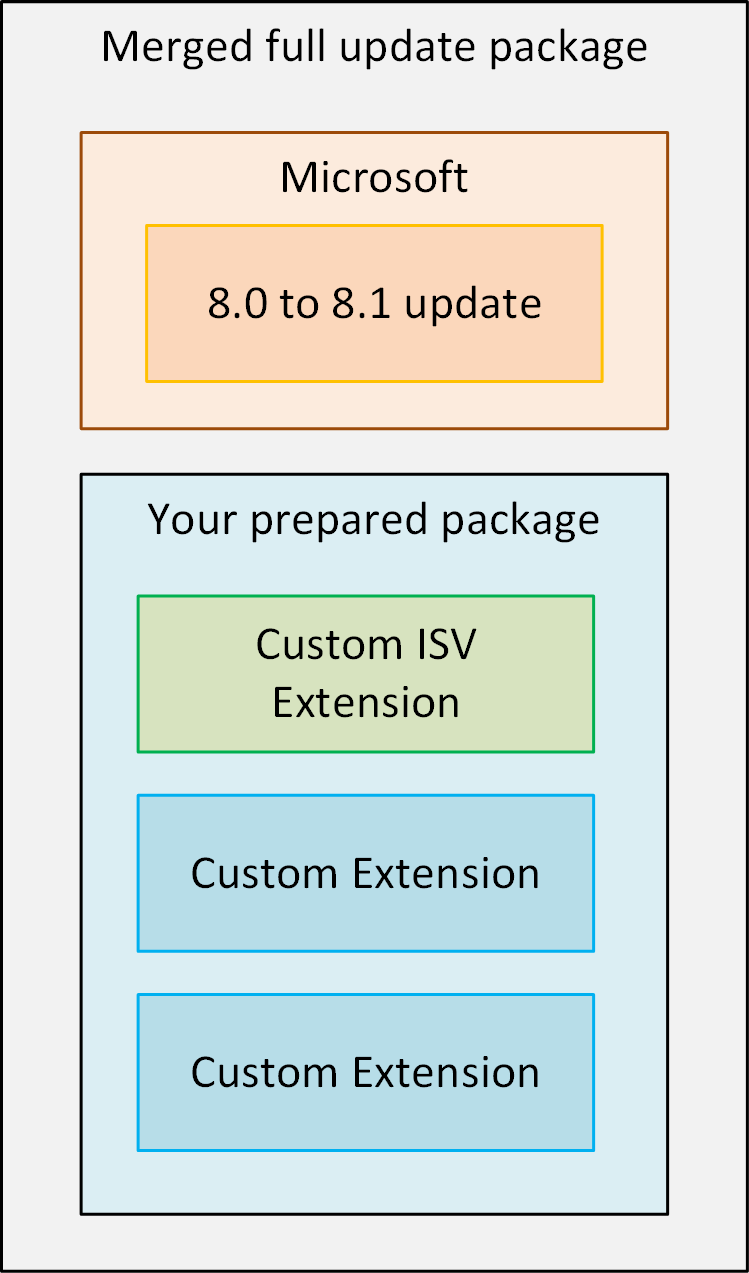
If all your demo and test environments where using the same set of non-Microsoft packages and modules, you'll simply reuse the same merged package to update all of them.

Happy updating!

Saturday, November 17, 2018

Setup a cloud storage for database copy operations

This post will show you how quickly and easily you can setup a cloud storage, and then copy the database around between your environments. Having said that, we are waiting on this feature in LCS, and eventually there will be tooling that does this for us in a fully managed way. However, while we are waiting, we can set this up ourselves.

Setup the Storage Account

You will (obviously) need an Azure Subscription for this to work. All of the steps below can be completed using a PowerShell script, so the advanced users will probably write that up. But I will here show have you can easily get this done with some clicking around. Still, you can set this all up in matter of minutes manually.

Start with opening the Azure Portal and open "Storage Accounts". You will create yourself a new one.


You will ned to choose a Resource Group, or create a new one. I typically have a Resource Group I put "DynOps" stuff in, like this Storage Account.

I want to make this a cheap account, so I tweak the settings to save money. I opt for only Local Redundancy and a Cold Tier. Perhaps the most important setting is the Region. You will want to choose a region that is the same as the VMs you are using. You get better performance and save some money (not much, though, but still).

Oh, and also worth mentioning, the account name must be unique. There are a few naming guidelines for this, but simply put you will probably prefix it with some company name abbreviation. If you accidentally pick something already picked, you won't be able to submit the form, for good measure.


It only takes a few minutes for Azure to spin up the new account, so sit back, relax and take a sip of that cold coffee you've forgot to enjoy while it was still warm.

The next thing you'll do is open the newly created Storage Account, and then scroll down on the "things you can do with it" and locate "Blobs". You will create yourself a new blob, give it a name, like for example "backups" or just "blob". Take note of the name, as you will need it later.


Then you will want to get the Access key. About the Access key, it needs to be kept as secret as possible, since it basically grants access to the things you put into this Storage Account. If you later worry that the key has been compromised, you can regenerate the Access key, but then your own routines will have to get updated as well. There are some other ways to secure usage of the Storage Account, but for the sake of simplicity I am using the Access key in this example.


And now you are set. That entire thing literally takes just a few minutes, if the Azure Portal behaves and you didn't mess anything up.

Using the Storage Account

I've become an avid user of the PowerShell library D365FO.tools, so for the next example I will be using it. It is super easy to install and setup, as long as the VM has an Internet connection. I'm sure you will love it too.

Assuming it is installed, I will first run a command to save the cloud Storage Account information on the machine (using the popular PSFramework). This command will actually save the information in the Registry.


# Fill in your own values
$params = @{
    Name = 'Default'                      # Just a name, because you can add multiple configurations and switch between them
    AccountId = 'uniqueaccountname'       # Name of the storage account in Azure
    Blobname = 'backups'                  # Name of the Blog on the Storage Account
    AccessToken = 'long_secret_token'     # The Access key 
}

# Create the storage configuration locally on the machine
Add-D365AzureStorageConfig @params -ConfigStorageLocation System -Verbose 

Now let's assume you ran the command below to extract a bacpac of your sandbox Tier2 environment.

Import-Module d365fo.tools
 
$dbsettings = Get-D365DatabaseAccess
 
$baseParams = @{
    DatabaseServer = $dbsettings.DbServer
    SqlUser = 'sqladmin'
    SqlPwd = 'SQLADMIN_PASSWORD_FROM_LCS'
    Verbose = $true  
}
$params = $baseParams + @{
    ExportModeTier2 = $true
    DatabaseName = $dbsettings.Database
    NewDatabaseName = $($dbsettings.Database + '_adhoc')
    BacpacFile = 'D:\Backup\sandbox_adhoc.bacpac'
}
 
Remove-D365Database @baseParams -DatabaseName $($params.NewDatabaseName)
New-D365Bacpac @params

You now want to upload the bacpac (database backup) file to the blob in your cloud Storage Account using the following PowerShell script.

Set-D365ActiveAzureStorageConfig -Name 'Default' 
 
$StorageParams = Get-D365ActiveAzureStorageConfig
Invoke-D365AzureStorageUpload @StorageParams -Filepath 'D:\Backup\sandbox_adhoc.bacpac' -DeleteOnUpload 

The next thing you do, is jump over to the VM (Tier1, onebox) where you want to download the bacpac. Obviously, D365FO.tools must be installed there as well. Assuming it is, and assuming you've also run the command above to save the cloud Storage Account information on the machine, you can run the following PowerShell script to download.

Set-D365ActiveAzureStorageConfig -Name 'Default' 
 
$StorageParams = Get-D365ActiveAzureStorageConfig
Invoke-D365AzureStorageDownload @StorageParams -Path 'D:\Backup' -FileName 'sandbox_adhoc.bacpac'

Finally, you would run something like this to import the bacpac to the target VM.

Import-Module d365fo.tools
 
$bacpacFile = 'D:\Backup\sandbox_adhoc.bacpac'
$sourceDatabaseName = "AxDB_Source_$(Get-Date -UFormat "%y%m%d%H%M")"
 
#Remove any old temp source DB
Remove-D365Database -DatabaseName $sourceDatabaseName -Verbose
 
# Import the bacpac to local SQL Server
Import-D365Bacpac -ImportModeTier1 -BacpacFile $bacpacFile -NewDatabaseName $sourceDatabaseName -Verbose
 
#Remove any old AxDB backup (if exists)
Remove-D365Database -DatabaseName 'AxDB_original' -Verbose
 
#Stop local environment components
Stop-D365Environment -All
 
#Switch AxDB with source DB
Switch-D365ActiveDatabase -DatabaseName 'AxDB' -NewDatabaseName $sourceDatabaseName -Verbose
 
Start-D365Environment -All

Isn't that neat? Now you have a way to copy the database around, while we're waiting for this to be completely supported out of the box in LCS - fingers crossed!

Thursday, November 1, 2018

Upgrade from 7.x to 8.+ series | Post 5 | Upgrade Sandbox and finally Production

Introduction

[EDIT]: Changes since November 2018 has forced me to made some changes to these series. I will point out the changes.

In these series of posts. I will try to run you through the process of how you can complete the upgrade from 7.x to 8.+ of Dynamics 365 for Finance and Operations.

Quick navigation:
Upgrade from 7.x to 8.+ series | Post 1 | Start in LCS
Upgrade from 7.x to 8.+ series | Post 2 | Deploy Dev and Grab source DB
Upgrade from 7.x to 8.+ series | Post 3 | Validate Code and Data in Dev

Prepare a sandbox upgrade for validation

[EDIT]: This section has been modified.

Before you can go ahead and request an upgrade of Production, you will want to do a pre-production validation in the sandbox environment. You may read the details here:
https://docs.microsoft.com/en-us/dynamics365/unified-operations/dev-itpro/migration-upgrade/upgrade-latest-update#upgrade-your-tier2-standard-acceptance-test-sandbox-environment

Before you start this process, you will want to make sure you have the following uploaded to LCS Asset Library:
  • Upgraded application ("Application deployable package"), downloaded or released from the successfull build
  • The Update package ("Platform and application binary package") which you prepared on step 3 in the series, and installed on the build in step 4 of the series
You will service the sandbox and install the packages. If you're smart, you will merge the two packages into one single package, and service them together in one single operation. Merging package works as long as long as they are on same platform version.

Now you can let the users start hammering on the system to potentially discover everything is flawless (knock on wood).

If you do not have any Production deployed yet, the steps are:
  1. Redeploy sandbox with target version. Make sure to select the upgraded application package. If you don't, you will have to install it afterwards, before you continue to the next step.
  2. Import the upgraded bacpac from step 3 in the series. Here you can use the tooling in LCS if the database was uploaded into the Project Asset Library.
  3. Validate!

Production

When you have validated the sandbox, and you are ready to upgrade Production, you will replay the steps you did in the sandbox, but this time in Production

Good luck!

Upgrade from 7.x to 8.+ series | Post 4 | Setup a new Build

Introduction

[EDIT]: Changes since November 2018 has forced me to made some changes to these series. I will point out the changes.

In these series of posts. I will try to run you through the process of how you can complete the upgrade from 7.x to 8.+ of Dynamics 365 for Finance and Operations.

Quick navigation:
Upgrade from 7.x to 8.+ series | Post 1 | Start in LCS
Upgrade from 7.x to 8.+ series | Post 2 | Deploy Dev and Grab source DB
Upgrade from 7.x to 8.+ series | Post 3 | Validate Code and Data in Dev

Some preparations before deploying Build VM

Basically, what we want to do is to have the new 8+ branch the build environment will pull code from. Beyond that you may want to have additional development branch to isolate ongoing development in the future, but I've left that out of the scope of this article.
If you've read the previous posts, you know the Code Upgrade in LCS created a "release" branch folder with a prepared upgraded application, and given that you've completed the code upgrade and validation as mentioned in the previous post, you should now be able to copy the result over to a new main branch for 8+.

The flow can be displayed sort of like this:


Now, obviously you're most likely going to delete/remove the old main branch and possibly also the "release" branch in the future. But the flow above can still be achieved. There are many ways to actually do this, and some have very strong opinions on how to branch the source.

You can easily create a new main branch by using the prepared "release" as source. You can do this using Source Code Explorer inside of Visual Studio running on your development VM.


You will simply give the new branch a unique name, separating it from the old main.


The name of the branch can actually be changed later, if that bothers you. However, we will deploy a Build environment later, and this will create a Build definition that needs the branch name to be correct - or the build definition will not work.

Don't forget, your changes locally on the VM will need to be committed to Azure DevOps (VSTS).


Another thing we will want to do is to create ourselves an isolated Agent Pool in Azure DevOps (VSTS). We want to make sure only 8+ build agents are in this pool of agents. You will need at least one, but who knows if you will add more in the future.

You will need some permissions in Azure DevOps (VSTS) to create this, but start at the Organization level and create a new Pool. I named it D365FO81 (since it will be used for 8.1.x). I have lots of projects not related to Dynamics, so I didn't want to push the agent pool to all projects.


I then opened the Project itself and added the Agent Pool to the project.


Deploy Build VM

[EDIT]: This section has been edited.
Now, we are ready to head back to LCS and deploy a Build VM. And with the preparation above, we can fill out the VSTS-part like this, and it will make sure to put the build agent on the right pool, plus make sure the deployed build defintion points to the right branch.


Select the correct topology, and if you're deploying this on a private/self hosted Azure Subscription, you can chose a setup with DS13v2 and 14 standard disks of size 64GB. Again, leaning on the community here to learn what they recommend. These things change over time, and I can't promise I'll get back to this post and update it.

If you deleted the existing MS Hosted build environment, and deploy a new MS Hosted, you won't get any options to decide on VM size or disk setup.


Notice I fill in the name of the Agent Pool and the name of the branch. I also give the agent a unique name. It will take quite some time before the Build environment is up and running.

EDIT: Before you continue, go ahead and install the same update package installed on the Development environment from step 3 in my series. Installing this same "Platform and application binary package" on the Build environment will ensure the build is running on the exact same version, and the artifact created from the build pipleline is of the same version. The next time, in the future, you want to get more updates of the platform and application, you can create the update package through the Update tiles on the Build environment. 

When it is, you will go ahead and schedule a build on the new Build Definition. The job will be picked up by the right Agent Pool, and then picked up by the agent sitting on the Build VM.

When the Build is complete, make sure to upload the Deployable Package to the LCS Asset Library. You will need it for the final post.


Upgrade from 7.x to 8.+ series | Post 3 | Validate Code and Data in Dev

Introduction

[EDIT]: Changes since November 2018 has forced me to made some changes to these series. I will point out the changes.

In these series of posts. I will try to run you through the process of how you can complete the upgrade from 7.x to 8.+ of Dynamics 365 for Finance and Operations.

Quick navigation:
Upgrade from 7.x to 8.+ series | Post 1 | Start in LCS
Upgrade from 7.x to 8.+ series | Post 2 | Deploy Dev and Grab source DB
Upgrade from 7.x to 8.+ series | Post 3 | Validate Code and Data in Dev (you are here)

Connect to code

[EDIT]: This section has been edited.

Given the code upgrade is completed in LCS, a process that shouldn't take many hours, and the Development VM is published, you can connect the local PackageLocalDirectory to the branch folder holding the "release".

Open Visual Studio, Connect to the Azure DevOps (VSTS) account and the right project, and then map your workspace to the "release". Notice I point the Metadata folder under the release to my local PackageLocalDirectory.


Let's have a quick look at the result from the Code Upgrade process. Like I wrote in the first post, the upgrade removes Microsoft hotfixes, but keeps any other custom packages and modules.

Put another way, the code upgrade will first copy your source metadata, then remove Microsofts modules, and it will sort of look a little bit like this.


If you were to take one of your existing development VMs and connect to the "release" branch folder and run a "Get Latest", the exact same steps would happen on your machine; you would see all the Microsoft Standard Module files be deleted under your PackageLocalDirectory. DON'T DO IT!

You may wonder why that doesn't happen on the new development VM. Well, since the Workspace you have just created on the new VM was created after the cleanup of the upgraded branch, nothing gets deleted locally when you run "Get Latest" on the new "release" branch folder.

So next you basically will have to make sure your application builds and works as expected - before you can continue.

EDIT: I would recommend using this opportunity to look at the update tiles on this Development environment, and then take the updates of standard now. This process will create a "Platform and application binary package" (also referred to as "plat+app"). Install this update on the Development environment now, and plan on using this same update package through out the process, on the build environment and the sandbox, all the way to production. The exception is if you find that you need to take a new and even more up-to-date package. This package will contain both platform updates AND application updates. When you install it on the Development environment, you will get the latest source code on the box as well.

Upgrade the Data 

[EDIT]: This section has been edited.

Assuming you Exported the database from the sandbox using LCS, you can download the bacpac directly from the project asset library. Currently there is no solution in LCS to Import a database, but there is a guide on docs for the steps involved importing a bacpac manually. Using D365fo.tools below, you can do the same manual import with ease. Just skip the download part of my original post below, but execute the Import part. 


When you application is 8.+, you can go ahead and get the 7.x database and upgrade it on this development environment. This process should reveal any possible technical issues of sorts.

Let's first download the database to the VM from the cloud storage mentioned on post 2. You can either use Microsoft Azure Explorer or use the community driven PowerShell library d365fo.tools, like this.

Import-Module d365fo.tools

$dbsettings = Get-D365DatabaseAccess

$params = @{
    AccountID = 'STORAGE_ACCOUNT_NAME'
    AccessToken = 'LONG_AND_SECRET_ACCESS_KEY_FOUND_ON_THE_STORAGE_ACCOUNT_IN_THE_AZURE_PORTAL'
    Blobname = 'NAME_OF_THE_BLOB'
    Path = 'D:\Backup\'
    FileName = 'sandbox_adhoc.bacpac'
}

Invoke-D365AzureStorageDownload @params

[EDIT]: After downloading the bacpac from the Project Asset Library, you can start the import steps below.

With the database extract (bacpac), you will have to import it, overwriting the existing AxDB. There are a few gotchas when doing this, and you can either do it manually, following the guide on docs, or you can again use the PowerShell library d365.tools to help you out:

Import-Module d365fo.tools

$bacpacFile = 'D:\Backup\sandbox_adhoc.bacpac'
$sourceDatabaseName = "AxDB_Source_$(Get-Date -UFormat "%y%m%d%H%M")"

#Remove any old temp source DB
Remove-D365Database -DatabaseName $sourceDatabaseName -Verbose

#Stop local environment components
Stop-D365Environment -All

# Import the bacpac to local SQL Server
Import-D365Bacpac -ImportModeTier1 -BacpacFile $bacpacFile -NewDatabaseName $sourceDatabaseName -Verbose 

#Remove any old AxDB backup (if exists)
Remove-D365Database -DatabaseName 'AxDB_original' -Verbose

#Switch AxDB with source DB
Switch-D365ActiveDatabase -DatabaseName 'AxDB' -NewDatabaseName $sourceDatabaseName -Verbose

Start-D365Environment -All

The script above does several things, like importing the bacpac and replacing the existing AxDB with the imported database. The whole process may take quite some time, because the bacpac import is a slow process. Also, the actual mdf and ldf file for the AxDB will have a date and timestamp, making it unique for each time you import - if you need to do it more than once.

When the database is imported, you will need to head back to LCS and apply the Software Deployable Package created by Microsoft specifically for doing the DataUpgrade. This process will also take some time, but at the end of it, you will have an upgraded database. The package is named DataUpgrade-8-1 and if you look at its description, it is one single package that upgrades the database from any previous 7.x version to 8.1.


In the next post, I will show one possible way to prepare your new build for 8+, which is a necessity before you can continue with updating your Sandbox and later your Production.

Upgrade from 7.x to 8.+ series | Post 2 | Deploy Dev and Grab source DB

Introduction

[EDIT]: Changes since November 2018 has forced me to made some changes to these series. I will point out the changes.

In these series of posts. I will try to run you through the process of how you can complete the upgrade from 7.x to 8.+ of Dynamics 365 for Finance and Operations.

Quick navigation:
Upgrade from 7.x to 8.+ series | Post 1 | Start in LCS
Upgrade from 7.x to 8.+ series | Post 2 | Deploy Dev and Grab source DB (you are here)
Upgrade from 7.x to 8.+ series | Post 3 | Validate Code and Data in Dev

Deploy 8.x environments


Choose the version closest to the target version you are aiming for.

You will need to deploy new environments. There is no "in-place" upgrade of your existing environments. The new environments will be on the version you are upgrading to. Fortunately, deploying new environments is easy to do through Lifecycle Services (LCS). You will need a decent Development VM to connect to the upgraded metadata, and check the code for any issues.

I typically go for a DS13v2 which has local SSD. I normally give it 14 disks of size 48GB, which will all be striped for maximum throughput. This has served me well so far. I don't chose premium storage, but go for standard storage. There are probably lots of preference out there, and I'm more than willing to learn from the community what they recommend.

Make sure the VM is hosted on your own (or customers) Azure Subscription. This way you are guaranteed to get local admin user. Also make sure the topology is Development. Pick an empty database, as you won't need that Contoso data for what we're about to do.

Prepare Database

[EDIT]: This section has been edited.

You can simply Export the database through LCS portal. LCS will create a bacpac of the sandbox database and save it in the project Asset Library. You should consider Refresh the sandbox with a fresh copy of the Production database. All of these steps are now easily done directly in the LCS portal.


While the Development VM is deploying, here's another neat thing you can do, if you haven't already done so. Setup a cloud Storage Account in the Azure Subscription. It can be a cheap Standard Storage (general purpose v2) type, with only Local Redundancy, on a Cold Tier - nothing fancy. Create yourself a blob storage where you can put the database which you will get from your source environment. If you haven't done this in Azure Portal before, let this be your first time. Things to consider; the Storage Account name must be unique (for that specific Azure Region). But you're a good citizen, and always used a good naming practice, right?

You will need three things from this cloud storage:
  1. The Storage Account Name
  2. The name of the blob storage
  3. The Access Key (which is found on the Azure Blade - look for the yellow key icon).
When you have the storage account ready, I bet the deploying of the Development VM is still spinning, so let's prepare a backup of the source database. We will use it to validate the upgrade. This is just a test, to make sure the upgrade experience will be smooth.

Head over to your Sandbox (Tier2) AOS, and extract the database from there. If you want to test on a fresh copy from Production, you will have to get Microsoft to do a Database Refresh first. But let's assume the one on the Sandbox is fresh enough.

The possibly quickest and easiest way to get the database extracted, at the point of writing, and while we are waiting on Microsoft to get the tooling in place in LCS, is to use the community driven D365FO.tools PowerShell Library.

Install the library on the AOS server using the following command. You'll have to click "Yes" and "Yes to all" on any questions.

Install-Module d365fo.tools

Then run the following to extract the database. It basically prepares a bacpac where all the post-SQL are run, and saves it do the D-drive.

Import-Module d365fo.tools

$dbsettings = Get-D365DatabaseAccess

$baseParams = @{
    DatabaseServer = $dbsettings.DbServer
    SqlUser = 'sqladmin'
    SqlPwd = 'SQLADMIN_PASSWORD_FROM_LCS'
    Verbose = $true   
}
$params = $baseParams + @{
    ExportModeTier2 = $true
    DatabaseName = $dbsettings.Database
    NewDatabaseName = $($dbsettings.Database + '_adhoc')
    BacpacFile = 'D:\Backup\sandbox_adhoc.bacpac'
}

Remove-D365Database @baseParams -DatabaseName $($params.NewDatabaseName)
New-D365Bacpac @params

Then using the cloud storage you've hopefully prepared, lets upload the bacpac to the cloud. We will later download it to the development VM.

Import-Module d365fo.tools

$params = @{
    AccountID = 'STORAGE_ACCOUNT_NAME'
    AccessToken = 'LONG_AND_SECRET_ACCESS_KEY_FOUND_ON_THE_STORAGE_ACCOUNT_IN_THE_AZURE_PORTAL'
    Blobname = 'NAME_OF_THE_BLOB'
    FilePath = 'D:\Backup\sandbox_adhoc.bacpac'
    DeleteOnUpload = $false
}

Invoke-D365AzureStorageUpload @params

The database extract in form of a bacpac now awaits in the cloud storage, and when the development VM is ready, you can use the same PowerShell Library to download it and install it on your development VM.

But first, you need to make sure the application actually builds. I will address that in the next post.


Upgrade from 7.x to 8.+ series | Post 1 | Start in LCS

Introduction

[EDIT]: Changes since November 2018 has forced me to made some changes to these series. I will point out the changes.

In these series of posts. I will try to run you through the process of how you can complete the upgrade from 7.x to 8.+ of Dynamics 365 for Finance and Operations.

Quick navigation:
Upgrade from 7.x to 8.+ series | Post 1 | Start in LCS (you are here)
Upgrade from 7.x to 8.+ series | Post 2 | Deploy Dev and Grab source DB
Upgrade from 7.x to 8.+ series | Post 3 | Validate Code and Data in Dev

The details for this upgrade is already very much detailed already on docs, so this article is just "another" way of taking you through the steps. I will focus on the simplest example possible. I know "your miles may vary" if you have a more complex environment you need to upgrade. Things like over-layered code, dependencies to other systems through integrations, or your solution has third party solutions added, which may not be ready for upgrade. But let's assume for the sake of simplicity that you're on 7.x without any over-layering and you want to get on version 8 with as little fuzz as possible.

In fact, if you do not have any over-layered code, and all extensions are compatible with 8+, this part will take less time than it will take you reading the post.

Code upgrade 

Before you begin the code upgrade, you need to make sure a "magic" file is created on your repository in Azure DevOps. The file is not created by any other process (I know of). The file holds the value of the version you are upgrading from, and it needs  to be named "ax7.version" and must sit in the Trunk/Main folder. There are a couple of ways to get the file created, but one very simple and pragmatic way is to simply create the file in the repository through the browser. Open the repository and navigate to Trunk/Main and create a new file directly.


You need to fill the file with the version number of your source. The version number can be found in docs, but allow me to list a few of them here:

7.3.11971.56116
7.2.11792.56024
7.1.1541.3036

In the example below I am upgrading from 7.3.


The file should be placed on the same level as the Metadata-folder.


When the file is created, you can go ahead and run the code upgrade in LCS.


The code upgrade tool does a couple of things. You will get some reports and information of what the process discovers of work to do, based off whatever you have in your Trunk/Main. But the important thing it does, is it will create a new folder in your repository, and this folder will contain the upgraded version of your code.
That is right; it copies whatever is in Trunk/Main, puts it into another folder, and does a couple of additional things, like removing all the hotfixes you may have previously added to Trunk/Main.
Why? Because you're going to a new version, and those old hotfixes either already exists in the target version, or you will need to reapply them using updates created specifically for the version you are going to. In fact, if you run the Code Upgrade process again and again and again, you will end up with as many copies as you run the tool. Don't worry, you're permitted to delete copies you do not want to keep.

Oh, and the copy (or copies) are also marked as a branch from Trunk/Main. You can see this of you check the folder Properties from either the Releases or from Trunk/Main.


Do you really need to run the code upgrade? Well, you could create a 8+ branch yourself and merge in the modules you're keeping to your 8+ branch, and then try build and resolve any issues. But consider that the code upgrade tool does that for you, gives you some details on what it finds. You don't have to do much beyond the steps out lined above. Time saved, and cost saved.

Actually, while LCS analyzes your code, you can start on the next step in the process, and I will talk about those in the next post.